Wednesday, 7 December 2011

Arctic Monkeys digipak analysis


This is the front cover, disc, back cover and inside cover from, the British indie rock band, the Arctic Monkeys debut album 'Whatever people say I am, thats what im not'. The album was released in 2006 and featured two number 1 hits.

Front cover:
The image on the front cover is a close up of a rough looking man smoking a cig, this could represent the style and genre of the band. The man is sat infront of a black background wearing a white t shirt which straight away draws your attention to him and makes him stand out. The artist name is on the top right of the cover abover the mans head, it is written in black in a modern looking font on a white square which really makes it stand out. The cig is featured a number of times trhoughout the digipak and the disc is made to look like an ash tray.

Back cover:
The back cover is very similar to the front cover, the man is again there in a white top against the dark back ground but this time he has his head in his hands and is holding the cig. Conventionally the song titles are on the left hand side and are also in white which makes them stand out against the dark background.

Disc:
The disc is made to look like an ash tray which keeps the 'theme' of cigs continuous. It is also in black and white to match the rest of the digipak.

Thursday, 24 November 2011

Update

After watching our footage and putting a lot of it together we noticed that some of the shots didnt work in sequence with the rest of the shots or just werent very good so we are going to reshoot these shots and also film the final shots we need to complete our video.

We have scheduled to reshoot on Saturday the 3rd of December when we will hopefully capture the rest of the shots needed and succesfully reshoot the bad shots.

Shots to reshoot

We are going to reshoot these two shots as they just dont look realistic. Unfortunately the main character in our video cant play the guitar so when he had to in our video he didnt know what he was doing so it just didnt look real and spoilt the effect of performance in the video. When we reshoot, Karim will be acting as our main character because he can play the guitar and as he will be wearing a mask you wont be able to tell that it is a different person.


We are also reshooting these three clips for a couple of reasons, one being they were just a bit shaky and didnt look very professional at all. They were also quite boring and they didnt flow together at all so were going to go for more interesting shots, something that will keep the viewer interested.


Falling to sleep effect

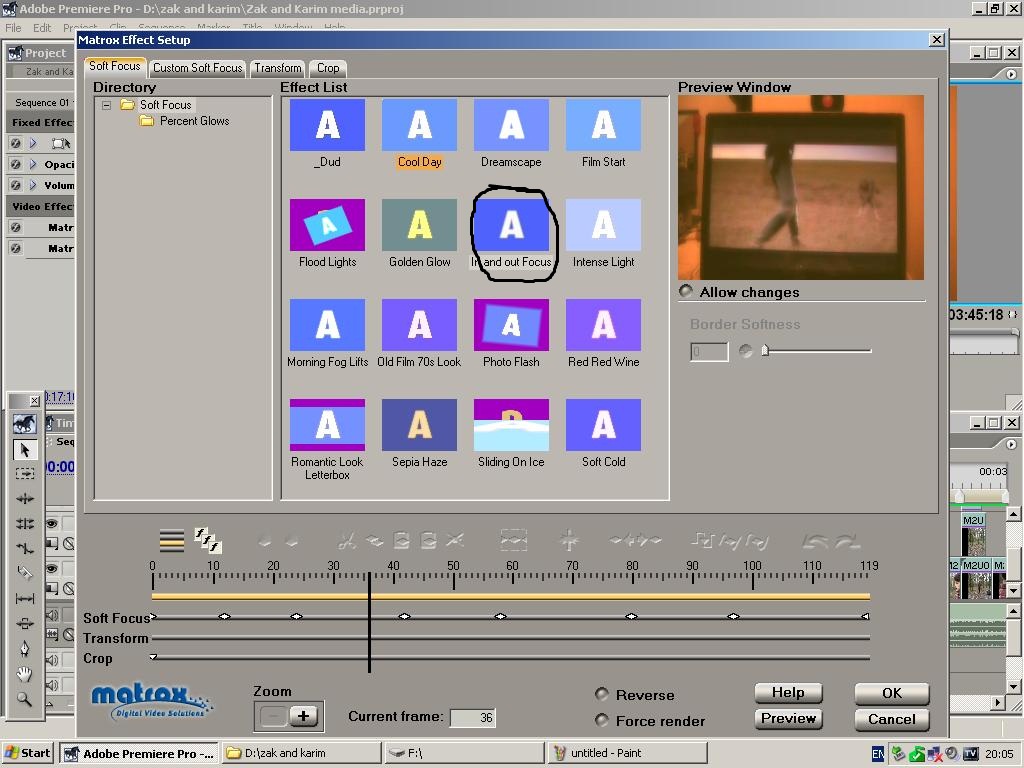
At the beginning of our video we wanted to make it look like our actor was falling asleep while watching a film, luckily there is an effect which allowed us to do this. Here is how we did it.


We opened up the Matrox effects folder and from there chose the effect 'soft focus' and dragged it on to the clip we wanted to use it on.


In the 'soft focus' effect was various different types of this effect and we chose the one named 'in and out of focus'. This effect made the image blur a little and then come back it to focus and it gave the impression our actor was falling asleep as it was used on a POV shot of him watching a film.


Wolf clone


We wanted to make it so we had the same person it the same shot multiple times in order to do so we had to keep the camera completely still and keep it recording while our actor stood in the various places that we wanted him to appear in in the shot. Once we had to the footage this is how we achieved it. 


Click on the effects tab, open up video effects and then open up the separate Matrox folder.

.

Once in the Matrox folder select 'Matrox advanced DVE's'.


We then dragged 'Matrox advanced DVE's' on to the clip we wanted, clicked on effect controls then open up the crop tab, from this were able to crop each shot so we were able to see the separate wolves but for this to week we had to drag each shot of the wolf on top each other and crop each one.

Rotating the horizon

 On one of the shots we filmed where Euan was running over the hill, the horizon of the hill was tilted and it didnt look right, so using the editing software we were able to tilt the horizon and make it straight. Below are the step by step screenshots of how we tilted the horizon.


 1) In this shot we can see the horizon is tilted.


2) Here, we clicked on the shot which brings up the box around it which allows you to drag it or make it bigger or smaller.


3) Here we have pulled the shot down slightly, this allows you to hover the mouse above the middle square on the top of the box, this allows you to rotate the shot.
 4) Here we have rotated the shot to make the horizon look straight.
5) And here we have pulled the shot back up to fit properly in the screen.

Reverse clip

As our music video is meant to be a dream, at the end of the video, just before our main character wakes up we wanted the whole video to go really fast in reverse to act as if he is dream is all going backwards. Below are screen shots of the steps we took to acheive the reverse clip. 
  

1) First of all we had to highlight all of the footage on the timeline that we wanted to put in reverse.
2) Once we had highlighted all the footage we wanted, we had to put it all on to a seperate sequence.
 3) Once the footage was in its own seperate sequence we had to export it and then important it again as a seperate video.
4) We then dragegd the video on to the timeline and placed it where we wanted it.
5) To then speed it up and put it in reverse we had to right click on the clip we wanted and select 'speed/duration'.
6) Finally, we had to tick the 'reverse speed' box to put it in reverse and change the speed in the top box.